 Emma
EmmaI. Introduction to Pressure Canning Raw Chicken
Pressure canning raw chicken is a fantastic way to ensure you always have convenient, ready-to-eat meals on hand. In this section, we'll delve into the reasons why pressure canning is a valuable skill for any homesteader or home cook, explore the numerous benefits of having canned chicken in your pantry, and provide an overview of what you can expect from this tutorial.
Why Pressure Canning?
- Preservation: Pressure canning is a method of preserving food by processing it at high temperatures, effectively destroying harmful bacteria and ensuring long-term shelf stability.
- Convenience: By pressure canning raw chicken, you can create a stockpile of ready-to-eat meals that require minimal preparation, perfect for busy weeknights or emergencies.
- Self-Sufficiency: Learning to pressure can your own food empowers you to become more self-sufficient, reducing reliance on store-bought canned goods and ensuring food security for you and your family.
Benefits of Having Canned Chicken
Having home-canned chicken offers a plethora of advantages beyond mere convenience. Let's explore some of the key benefits:
- Cost-Effective: Canning raw chicken allows you to take advantage of bulk purchases or seasonal deals, saving money in the long run.
- Quality Control: By canning chicken at home, you have complete control over the quality of the ingredients, ensuring you use only the freshest, highest-quality meat.
- Reduced Food Waste: Canning excess chicken from butchering sessions or discounted purchases helps minimize food waste by extending the shelf life of perishable meat.
- Versatility: Canned chicken can be used in a myriad of dishes, from sandwiches and salads to soups, stews, and casseroles, making it a versatile pantry staple.
Introduction to the Tutorial
In this tutorial, we'll walk you through the entire process of safely pressure canning raw chicken, providing detailed step-by-step instructions, essential tips, and expert guidance to ensure your success. Whether you're a seasoned homesteader or a novice home cook, you'll find everything you need to confidently preserve chicken for long-term storage and enjoy delicious meals whenever you need them.

II. Understanding the Process of Pressure Canning
Before delving into the actual process of pressure canning raw chicken, it's crucial to understand the various methods, safety precautions, and guidelines involved. This section aims to provide you with a comprehensive overview to ensure a successful and safe canning experience.
TIP: Let baked goods cool on a wire rack to prevent them from becoming soggy and to maintain texture.
Raw Pack vs. Hot Pack Methods
- Raw Pack Method: In the raw pack method, raw cubed chicken is placed directly into the canning jars without any pre-cooking. This method is simpler and requires less preparation time.
- Hot Pack Method: The hot pack method involves partially cooking the chicken in liquid before filling the jars. While this method requires extra steps, some prefer it for its potential to yield a more flavorful end product.
Both methods are safe for canning chicken, and the choice between them often comes down to personal preference and convenience.
Safety Precautions and Guidelines
When pressure canning raw chicken, it's essential to prioritize safety to prevent the risk of foodborne illness or spoilage. Here are some key safety precautions and guidelines to keep in mind:
- Use Approved Recipes: Always follow approved pressure canning recipes from reliable sources, such as the USDA or reputable canning guides. These recipes have been scientifically tested to ensure safe preservation.
- Ensure Proper Processing: Be diligent in processing the jars at the correct pressure and duration specified in the recipe. Inadequate processing can result in undercooked food and compromised safety.
- Inspect Equipment: Before starting the canning process, thoroughly inspect your pressure canner, jars, lids, and other equipment for any signs of damage or wear. Faulty equipment can lead to failed seals or unsafe canning conditions.
- Practice Good Hygiene: Maintain cleanliness throughout the canning process by washing hands, utensils, and work surfaces thoroughly. This helps prevent contamination and ensures the safety of the canned chicken.
Importance of Following Approved Recipes
Following approved canning recipes is paramount to ensure the safety and quality of the canned chicken. These recipes have undergone rigorous testing to determine the precise processing times, ingredient ratios, and techniques required for safe preservation.
Deviation from approved recipes, such as altering ingredient quantities or processing methods, can jeopardize the safety of the canned chicken and increase the risk of bacterial growth or spoilage.
Addressing Common Concerns
It's common for individuals new to pressure canning to have concerns or questions about the process. Here are answers to some frequently asked questions and common concerns:
- Is Pressure Canning Safe? Yes, when done correctly following approved recipes and guidelines, pressure canning is a safe and effective method for preserving low-acid foods such as chicken.
- Will Canned Chicken Be Fully Cooked? Yes, the pressure canning process fully cooks the chicken, resulting in a tender, flavorful product that is ready to eat straight from the jar.
- What if I Encounter Problems? If you encounter any issues during the canning process, such as failed seals or unusual odors, it's essential to err on the side of caution and discard the affected jars to avoid the risk of foodborne illness.
By understanding these fundamentals of pressure canning, you'll be well-equipped to embark on the journey of safely preserving raw chicken for long-term storage.
\nIII. Step-by-Step Guide to Pressure Canning Raw Chicken
Now that you understand the fundamentals of pressure canning and the importance of safety precautions, let's dive into the step-by-step process of pressure canning raw chicken. Follow these instructions carefully to ensure a successful and delicious outcome.
Supplies Needed for Pressure Canning
Before you begin pressure canning raw chicken, gather all the necessary supplies to streamline the process and ensure efficiency. Here's what you'll need:
- Pressure Canner: A reliable pressure canner with a tight-fitting lid is essential for safe and effective canning. Ensure your pressure canner is in good condition and has been tested for accuracy.
- Canning Jars: Use clean, sterilized canning jars specifically designed for pressure canning. Quart-sized jars are ideal for larger quantities, while pint-sized jars are suitable for smaller portions.
- Canning Lids and Bands: Use new, undamaged canning lids and bands to ensure proper sealing. Avoid reusing lids or bands that show signs of wear or rust.
- Canning Tools: Essential canning tools include a jar lifter, bubble remover tool, wide-mouth funnel, tongs, clean cloth, and a bowl of hot water or vinegar for wiping jar rims.
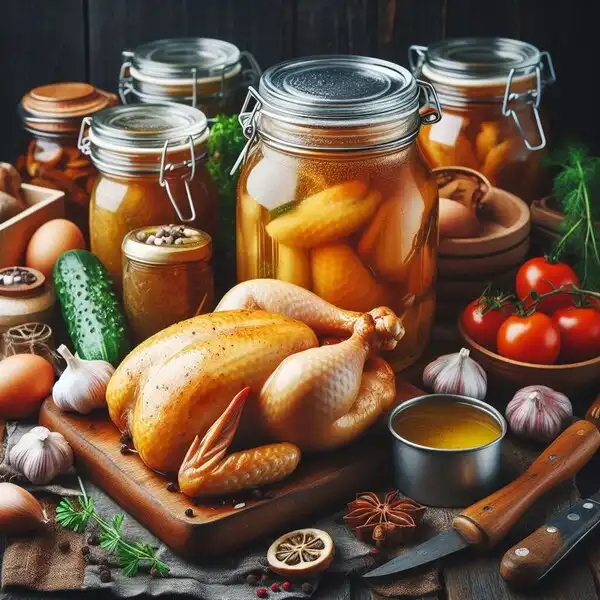
- Raw Chicken: Use fresh, high-quality raw chicken breasts or thighs for pressure canning. Remove any excess fat or skin before cubing the chicken into 1-inch pieces.
- Seasonings: While optional, adding seasonings such as salt or herbs can enhance the flavor of the canned chicken. Ensure that any seasonings used are safe for canning and do not contain additives that may affect the canning process.
Preparing the Pressure Canner
Before using the pressure canner, ensure it is clean and in proper working condition. Follow these steps to prepare the pressure canner for use:
- Fill with Water: Add approximately 2 inches of water to the bottom of the pressure canner.
- Insert Rack: Place the rack at the bottom of the pressure canner to prevent the jars from directly contacting the heat source.
- Preheat: Begin heating the water in the pressure canner over medium heat. The water should be hot but not boiling by the time you start processing the jars.
While the water heats up, you can proceed with preparing the chicken for canning.
Preparing the Chicken for Canning
Proper preparation of the chicken is crucial to ensure even cooking and safe preservation. Follow these steps to prepare the raw chicken for canning:
- Cube Chicken: Using a sharp knife, cube the raw chicken breasts or thighs into 1-inch pieces. Remove any excess fat or skin from the chicken.
- Wash Hands: Thoroughly wash your hands and work surfaces before handling the chicken to prevent cross-contamination.
With the chicken prepared, you're ready to fill the canning jars and begin the canning process.
Our latest post on Understand pressure canning practices tips covers everything you need to know. From interesting facts to in-depth analysis, it’s the ultimate resource for anyone interested in this topic.
Filling and Sealing the Jars
Now it's time to fill the sterilized canning jars with the prepared raw chicken. Follow these steps to fill and seal the jars:
- Fill Jars: Using tongs and a wide-mouth funnel, fill each canning jar with approximately two cups of cubed chicken, leaving about 1 1/4 inch of headspace at the top.
- Add Seasonings: Optionally, add seasonings such as salt or herbs to enhance the flavor of the chicken.
Continue filling and seasoning the jars until all the chicken has been used, ensuring consistent headspace for proper sealing.
Processing the Jars in the Pressure Canner
With the jars filled and sealed, it's time to process them in the pressure canner. Follow these steps to process the jars safely and effectively:
- Place Jars in Canner: Using a jar lifter, carefully place the filled jars into the preheated pressure canner, ensuring they are evenly spaced and not touching each other.
- Secure Lid: Place the lid securely on the pressure canner according to the manufacturer's instructions, ensuring it is properly aligned and sealed.
Now, you're ready to begin the processing cycle according to the recommended pressure and duration.
Cooling and Checking Seals
Once the processing cycle is complete, allow the pressure canner to cool naturally before removing the jars. Follow these steps to cool and check the seals of the canned chicken:
- Allow Natural Release: Turn off the heat and allow the pressure canner to depressurize naturally. Do not attempt to force-cool or remove the lid prematurely.
- Remove Jars: Once the pressure has been fully released, carefully remove the jars from the canner using a jar lifter.
As the jars cool, you'll hear the satisfying "ping" sound of the lids sealing. Once cooled, check each jar's seal by pressing down on the center of the lid. A properly sealed lid should not flex or move.
Explore our extensive write-up on Understand apple scrap vinegar guide and discover all the nuances and important details. It's an engaging read filled with useful knowledge.
With the jars successfully processed and sealed, your pressure-canned raw chicken is now ready for long-term storage and culinary adventures.
\nIV. Tips, Storage, and Usage of Canned Chicken
Now that you've mastered the art of pressure canning raw chicken, it's essential to understand how to store and utilize your canned chicken effectively. In this section, I'll provide you with valuable tips on storage, shelf life, and creative ways to incorporate canned chicken into your meals.
Take a deep dive into our article on All about lard tallow guide. This comprehensive guide will provide you with all the information you need to understand this subject better.
How Long is Canned Chicken Good For?
Proper storage is key to maintaining the quality and safety of canned chicken. While canned chicken is known for its long shelf life, it's essential to follow recommended guidelines for optimal freshness and flavor. Here's what you need to know about the shelf life of canned chicken:
Our blog post on All about vertical gardening tips is a must-read for anyone interested in the subject. It’s filled with comprehensive details and thoughtful perspectives.
- Shelf Life: When stored in a cool, dry place away from direct sunlight, properly canned chicken can last for up to one to two years or even longer.
- Check for Spoilage: Before consuming canned chicken, always check for signs of spoilage, including bulging lids, off-putting odors, or unusual discoloration. If you notice any abnormalities, discard the canned chicken immediately.
By adhering to proper storage practices and regularly inspecting canned chicken for freshness, you can enjoy delicious, high-quality chicken for an extended period.
Tips for Storage and Shelf Life
Maximize the shelf life of your canned chicken with these helpful tips for storage and preservation:
- Store in a Cool, Dark Place: Keep canned chicken in a pantry or cupboard away from heat sources and sunlight, as exposure to light and heat can accelerate the deterioration of the product.
- Rotate Stock: Practice first-in, first-out (FIFO) rotation to ensure that older canned chicken is used before newer ones, minimizing the risk of spoilage.
- Label and Date: Label each canned chicken jar with the date of canning to track its shelf life accurately. Additionally, include any seasoning or recipe details for easy identification.
- Avoid Temperature Extremes: Fluctuations in temperature can compromise the quality of canned chicken. Avoid storing canned chicken in areas prone to extreme heat or cold, such as attics or basements.
By following these storage tips, you can maintain the quality and flavor of your canned chicken for an extended period, ensuring that it's ready to use whenever you need it.
Creative Ways to Use Canned Chicken
Canned chicken is a versatile pantry staple that can be used in a variety of recipes to add protein and flavor to your meals. Here are some creative ways to incorporate canned chicken into your cooking:
- Chicken Salad: Use canned chicken as a convenient protein source for making delicious chicken salad sandwiches, wraps, or lettuce cups.
- Casseroles and Soups: Add canned chicken to casseroles, soups, and stews for an easy and hearty meal. It's a convenient way to elevate the flavor and nutritional value of your dishes.
- Stir-Fries and Pasta Dishes: Incorporate canned chicken into stir-fries, pasta dishes, and fried rice for a quick and satisfying meal. It pairs well with vegetables, noodles, and rice for a balanced and flavorful dish.
- Buffalo Chicken Dip: Whip up a crowd-pleasing buffalo chicken dip using canned chicken, cream cheese, hot sauce, and shredded cheese. It's perfect for game day gatherings and parties.
With a little creativity, canned chicken can be transformed into a wide range of delicious meals that the whole family will love. Experiment with different recipes and flavor combinations to discover new favorites.
Announcement: Meals On Your Shelf Pressure Canning Challenge
Are you ready to put your pressure canning skills to the test? Join us for the Meals On Your Shelf Pressure Canning Challenge, where participants compete to create the most innovative and delicious canned chicken recipes. Stay tuned for details on how to participate and win exciting prizes!
Additional Resources and Recipes for Home Canning
For more information on home canning techniques and recipes, explore the following resources:
- Canning Cookbooks: Check out reputable canning cookbooks for a wide range of tested recipes and expert tips on safe canning practices.
- Online Communities: Join online forums and communities dedicated to home canning to connect with fellow enthusiasts, share recipes, and seek advice from experienced canners.
- Government Guidelines: Refer to official guidelines from government agencies such as the USDA for up-to-date information on safe home canning practices and recommended recipes.
With these resources at your disposal, you'll have everything you need to continue your journey into the world of home canning and culinary creativity.