 Emma
EmmaUnderstanding Rendering Lard and Tallow
In this section, we'll delve into the fundamental aspects of rendering lard and tallow, exploring their definitions, processes, and the advantages they offer in homestead cooking.
What is Rendering Lard?
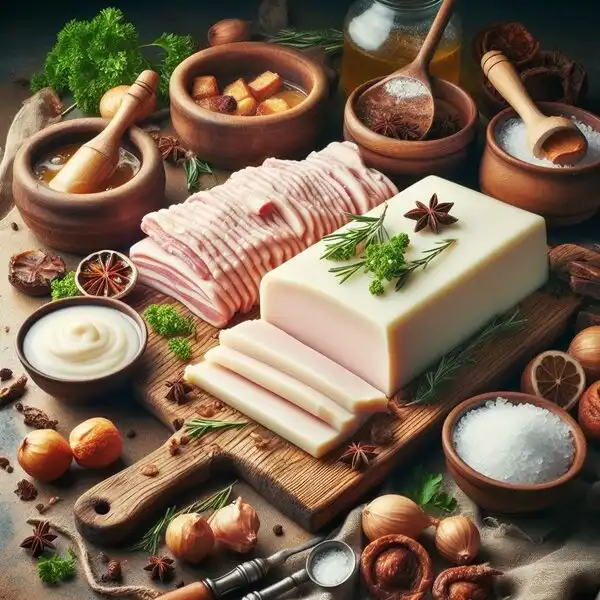
Rendering lard is a traditional culinary technique involving the melting of animal fat and the removal of impurities to produce a high-quality cooking fat. This process results in a creamy, white shortening that solidifies at room temperature and is ideal for various culinary applications.
- Definition and Process: Understanding the process of rendering lard, including heating fat to separate it from tissues and impurities.
- Benefits of Using Lard in Cooking: Exploring the nutritional benefits and culinary advantages of incorporating lard into homestead cooking.
Types of Animal Fat
Not all animal fats are created equal. Let's differentiate between lard and tallow and explore the various types of animal fat commonly used in cooking.
- Distinction Between Lard and Tallow: Highlighting the differences in composition and culinary uses between lard, derived from pig fat, and tallow, typically sourced from beef or sheep.
- Leaf Lard: The Ideal Choice for Baking: Discussing the superior quality of leaf lard, particularly prized for its suitability in baking applications.
- Fatback or Back Fat: Versatile Option for Cooking: Examining the culinary versatility of fatback or back fat, commonly utilized for frying and sautéing.
- Pork Belly: A Delicacy to Savor, Not Render: Advising against rendering pork belly due to its culinary value as a prized cut of meat.
Importance of Quality Fat
The quality of the fat used in rendering significantly impacts the flavor and nutritional value of the end product. Let's explore the factors to consider when sourcing animal fat for rendering.
- Considerations for Sourcing Fat: Discussing the importance of obtaining fat from healthy, preferably pasture-raised animals for optimal flavor and nutritional benefits.
- Impact of Animal Diet on Fat Quality: Highlighting how the diet and lifestyle of the animal influence the flavor and nutrient profile of the rendered fat.
Understanding these fundamental aspects of rendering lard and tallow lays the groundwork for successful homestead cooking and ensures the production of high-quality fats for culinary and household use.
TIP: Clean as you go to maintain a tidy workspace and make cleanup easier after cooking.
Tips and Techniques for Successful Rendering
Now that we have a solid understanding of what rendering lard and tallow entails, let's explore some essential tips and techniques to ensure your rendering process is a success.
Our in-depth coverage on Insights into freeze dried berries preservation ideas provides a wealth of information and insights. Be sure to check it out for a comprehensive understanding of the topic.
Common Concerns and Misconceptions
- Addressing Fear of Rendering Lard: Many individuals may feel hesitant or intimidated by the prospect of rendering lard due to unfamiliarity with the process or concerns about its health implications. Let's debunk common myths and reassure readers about the safety and benefits of rendering their own fats.
- Learning from Past Mistakes: If you've attempted rendering lard in the past and encountered challenges or unsatisfactory results, don't be discouraged. We'll explore common pitfalls and provide guidance on how to avoid them for a successful outcome.
Factors to Consider
- Temperature Control During Rendering: Maintaining consistent temperatures throughout the rendering process is crucial for achieving optimal results. We'll discuss the importance of monitoring heat levels and techniques for controlling temperature fluctuations.
- Avoiding Moisture and Impurities: Moisture and impurities can compromise the quality and shelf life of rendered fats. We'll provide practical tips on how to minimize moisture content and ensure the purity of your rendered lard or tallow.
Necessary Supplies for Rendering
- Equipment Checklist: Before embarking on the rendering journey, it's essential to have the right tools at your disposal. We'll outline the necessary equipment, including pots, strainers, and storage containers, to facilitate the rendering process.
- Importance of Using High-Quality Tools: Investing in high-quality rendering equipment can make a significant difference in the efficiency and outcomes of the rendering process. We'll emphasize the importance of using durable, food-grade tools for optimal results.
By addressing common concerns, understanding key factors influencing the rendering process, and ensuring you have the necessary supplies, you'll be well-equipped to embark on your lard and tallow rendering journey with confidence.
\nStep-by-Step Guide to Rendering Lard (and Making Cracklings)
Now that you're familiar with the fundamentals of rendering lard and tallow, let's dive into a detailed, step-by-step guide to walk you through the entire process. Whether you're a novice or experienced homesteader, this guide will help you produce high-quality lard and tallow for all your culinary and household needs.
Preparing the Fat
- Cleaning and Cutting Fat Pieces: Start by ensuring your fat is clean and free from any debris or impurities. Trim away any excess skin or meat attached to the fat, as these can affect the flavor and quality of the rendered lard. Cut the fat into small, uniform pieces for faster and more efficient rendering.
- Best Practices for Handling Raw Fat: When handling raw fat, it's essential to practice proper hygiene and food safety measures. Wash your hands thoroughly before and after handling the fat, and sanitize all utensils and surfaces that come into contact with the raw meat to prevent cross-contamination.
Rendering Process
- Heating and Melting Fat: Place the prepared fat pieces in a heavy-bottomed pot or Dutch oven over low to medium heat. As the fat heats up, it will begin to melt, releasing its liquid gold. Stir the fat occasionally to ensure even heating and prevent sticking or burning.
- Straining and Filtering: Once the fat has completely melted and there are no solid pieces remaining, it's time to strain and filter the liquid fat to remove any impurities or leftover tissues. Use a fine-mesh strainer or cheesecloth-lined sieve to strain the liquid fat into clean, heatproof containers. Allow the fat to cool slightly before proceeding to the next step.
Making Cracklings
- Utilizing Remaining Tissues for Snacks: The tissues and small bits of meat left behind after straining the fat are known as cracklings. These flavorful morsels can be seasoned and enjoyed as a delicious snack or used to add texture and flavor to dishes. Spread the cracklings out on a baking sheet and bake in a preheated oven until golden brown and crispy.
- Flavoring and Storing Cracklings: Get creative with seasoning your cracklings by sprinkling them with salt, pepper, herbs, or spices of your choice. Once cooled, store the cracklings in an airtight container at room temperature for up to a week, or freeze them for longer shelf life.
Following these step-by-step instructions will help you master the art of rendering lard and tallow, producing high-quality fats and delicious cracklings that will elevate your cooking and baking endeavors.
\nStorage, Usage, and Additional Tips
Now that you've successfully rendered your lard and tallow, it's essential to understand the best practices for storing, utilizing, and troubleshooting these traditional cooking fats. Proper storage techniques will ensure the longevity and quality of your rendered fats, while knowing their practical uses will allow you to incorporate them into various culinary and household applications.
Proper Storage Techniques
- Shelf Stability of Rendered Lard: When rendered properly and free from impurities, lard and tallow are shelf-stable fats. Store them in airtight containers at room temperature away from direct sunlight and heat sources. Properly stored lard can last for several months to a year without spoiling.
- Refrigeration vs. Freezing: While lard and tallow are shelf-stable, refrigeration or freezing can extend their shelf life further. If you anticipate not using the rendered fats within a few months, consider refrigerating them to prolong freshness. For longer storage, freezing is an excellent option. Divide the rendered fats into smaller portions and freeze them in labeled containers or freezer bags for easy use.
Practical Uses of Rendered Lard
- Cooking and Baking Applications: Lard and tallow are versatile fats with a high smoke point, making them ideal for frying, sautéing, and roasting. Replace butter or vegetable oil with lard in recipes to impart a rich flavor and tender texture to baked goods, such as pie crusts, biscuits, and pastries.
- Non-Culinary Household Uses: Beyond the kitchen, rendered lard has various non-culinary applications around the home. Use it to season cast iron cookware, lubricate tools and machinery, or make homemade soap and skincare products. Its natural moisturizing properties make it an excellent ingredient in DIY lotions, balms, and salves.
Troubleshooting and FAQs
- Addressing Common Issues: Despite following proper rendering techniques, you may encounter issues such as off-flavors, unusual odors, or texture inconsistencies in your rendered fats. These issues can be caused by factors such as the quality of the fat, improper storage, or contamination during rendering. Refer to troubleshooting guides or seek advice from experienced homesteaders to diagnose and resolve any problems.
- Tips for Optimal Results: To ensure optimal results when rendering lard and tallow, follow best practices for sourcing high-quality fat from reputable sources, maintaining cleanliness and hygiene during the rendering process, and storing the rendered fats properly. Experiment with different rendering methods, such as stovetop, oven, or slow cooker rendering, to find the technique that works best for you.
By understanding the storage, usage, and troubleshooting aspects of rendered lard and tallow, you can maximize their benefits and integrate them seamlessly into your homestead cooking and household routines.